With ecommerce email marketing automation, B2C marketers can expect more of the revenue benefits of personalized marketing—without the manual work of sending email campaigns.
Email marketing, in general, is still one of the most effective ways ecommerce businesses drive revenue.
But email automations, also known as flows, generate up to 30x more revenue per recipient (RPR) than one-off campaigns, according to Klaviyo’s latest email marketing benchmarks.
That’s because they’re sent automatically based on people’s real-time actions—which makes them timely, targeted, and relevant.
To be clear, we’re not saying you should ditch your email campaigns—these are still vital for promotions, limited-time offers, and other messages that make sense for a wider, segmented audience alongside your automated emails.
But here’s where you can expect to see some differences when you implement the right email automations:
Abandoned cart flows alone generate an average $3.65 RPR, compared to $0.11 for standard email campaigns, according to Klaviyo benchmarks.
Email automation works 24/7, which means you can engage subscribers 1:1 at every stage of their customer journey—and generate revenue in your sleep.
Personalized, data-driven messaging can address some of your most common and simple customer service requests, while freeing up your agents to handle complex requests more quickly.
In this updated 2025 guide, we share the 10 best ecommerce email marketing automations every business should implement. We also include real-world results backed by Klaviyo benchmarks to help you optimize your strategy.
But first, what are email automations, or flows, as we call them at Klaviyo? Here’s a quick breakdown.
1. Welcome series emails
Your welcome series is sent automatically when someone first subscribes to your email list. The goal of your welcome series is to introduce your brand and convert new subscribers into buyers.
According to the latest data from Klaviyo, thousands of ecommerce brands are reaching that goal: the average welcome flow generates $2.65 per recipient, with the top 10% achieving a placed order rate of 10.53%.
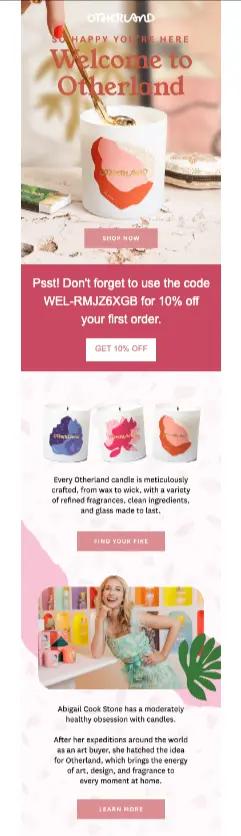
Here’s a great welcome email example from candle brand Otherland. With gorgeous product shots, a clear list of product benefits, an introduction to their founder, and a 10% discount, this welcome email is likely to seal the deal for new subscribers.
Welcome series pro tip: It’s important to remember that when someone signs up for your email list, that doesn’t mean you have their consent to text them, too. But for new subscribers who explicitly sign up for both your email list and your SMS list, your welcome flow can incorporate both text messages and emails.
2. Abandoned cart recovery emails
Your abandoned cart email is sent automatically when someone places an item in their cart on your website but doesn’t end up buying, , with the essential goal of re-engagement to encourage shoppers to complete their purchase.
And it works—according to the latest Klaviyo benchmarks, the abandoned cart flow has the highest RPR of any automation, averaging $3.65.
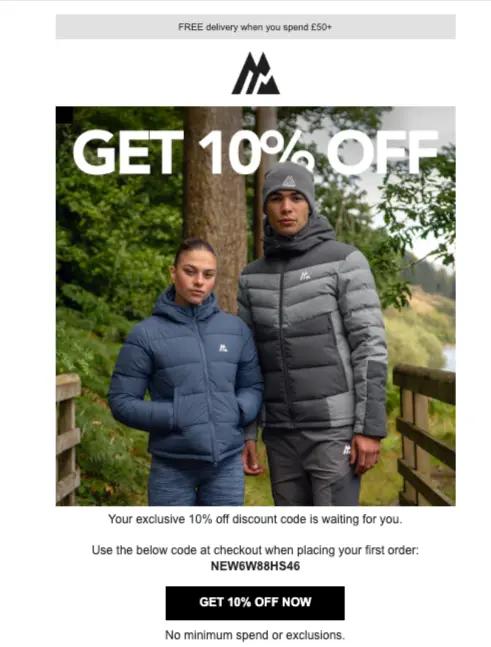
To see results like this, personalization is a must. For example, sportswear brand Montirex varies their cart recovery messaging according to the value of the item(s) left behind: shoppers only get a discount if they abandon a high-value cart.
This way, the brand doesn’t waste resources trying to capture lower order values. And the strategy works: the flow generates 30% of Montirex revenue attributed to Klaviyo.
Abandoned cart email pro tip: Always A/B test your subject lines and discount offers to find the right balance between urgency and persuasion.
3. Browse abandonment emails
Browse abandonment emails are sent automatically when your online store visitors leave without making a purchase. The goal of your browse abandonment automation is to nudge people back to your website so they can either browse similar products or complete a purchase.
According to Klaviyo benchmarks, these emails generate an average click rate of 5.48%, which is higher than most other automations.
Take a look at this example from shoe brand Charlotte Stone, which goes out after a shopper spends enough time looking at a certain product. The product recommendations are a great way to extend the shopper’s online browsing behavior—first in the email, and then, hopefully, back on the website.
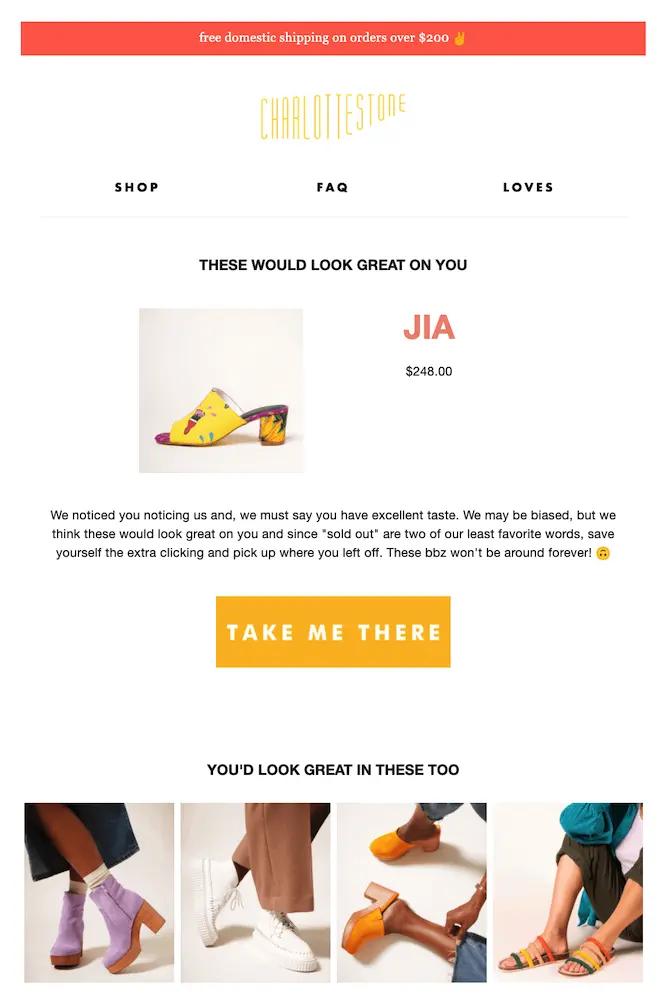
Browse abandonment email pro tip: Include a “You may also like” section that features complementary products. Use dynamic content—images and text that switch automatically based on certain criteria—to recommend products based on a subscriber’s location or preferences.
4. Post-purchase transactional emails
A transactional email is a type of post-purchase email that goes out automatically to one person to confirm an order, communicate important information, or deliver a specific notification, like a shipping confirmation, , and is part of the wider strategy of using automated emails to enhance customer experience.
The goal of a transactional email is to enhance communication and build trust and confidence with customers—all in the hopes of laying the groundwork for repeat purchases and re-engagement down the line as part of a well-mapped customer journey.
Given that they often contain essential information about a customer’s order, it’s no surprise that according to Klaviyo benchmarks, post-purchase emails have an open rate of 61.68%—the highest among all flows. But before you set up your post-purchase emails, it’s important to understand compliance laws around transactional vs. marketing emails.
Assuming you have someone’s consent to send them marketing emails, you have room to get creative with your post-purchase communications—even ones that are transactional in nature.
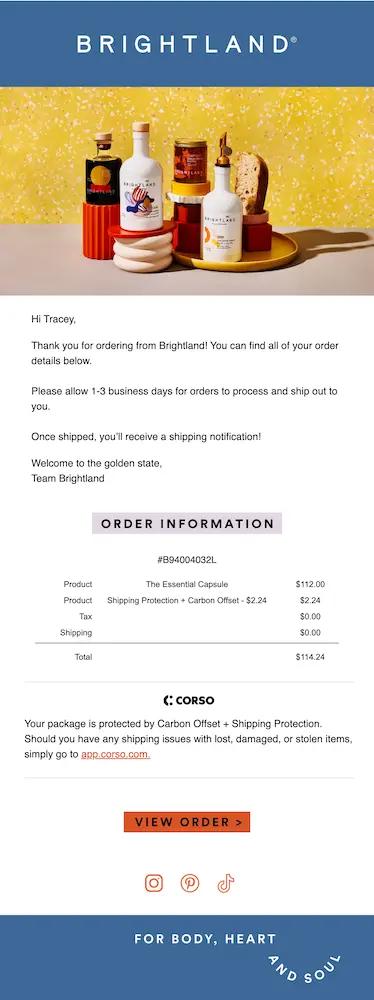
Check out this simple series from olive oil brand Brightland as an example. The first email confirms the customer’s order, with key information including timelines, order number, prices, and a link to view the order online. Note how it also aligns with the brand’s visual aesthetics, with a mouth-watering product shot and cheerful color palette, but doesn’t contain any marketing content.
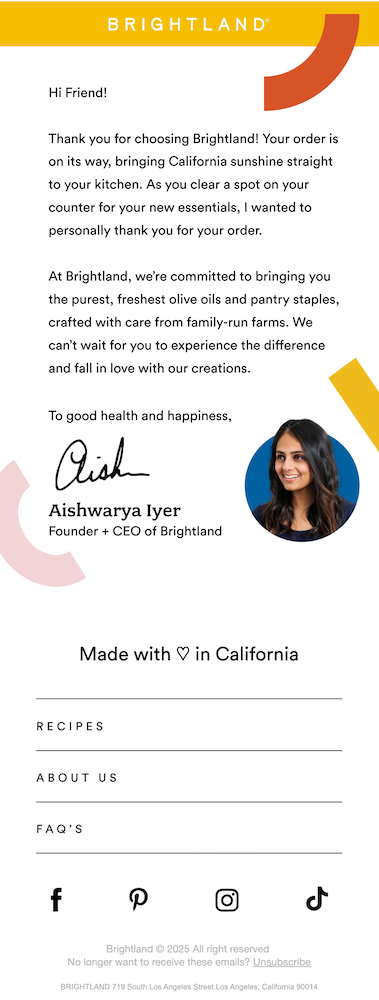
The second email features the same branding as the first, but reads more like a letter from a friend. It contains the founder’s headshot and signature and toasts to “good health and happiness.”
Transactional emails are especially important if your product comes with a complex production process. Manly Bands, for example, makes unique, hand-crafted wedding rings that often take weeks to produce. For them, stellar customer service means constant communication with their customers about the status of their order.
When Manly Bands’ manufacturers scan a ring at a new stage of production, it automatically updates a Google Sheet that Klaviyo’s API checks hourly. Status changes trigger update emails, which give customers insight into the 3- to 5-week production process.
This kind of proactive communication, facilitated by automation tools, reinforces a decision to purchase, which can lead to a recommendation to a friend later. It’s also a great example of the kind of marketing strategy and brand values that help Manly Bands generate 36% of overall revenue from email.
Post-purchase email pro tip: Add care instructions, set-up guides, or “behind the scenes” videos to add some practical value to your post-purchase emails.
5. Product review requests
Product review requests are emails that are automatically sent after a purchase—usually a few days after delivery—to ask the customer for a review. The goal of the product review request is to collect testimonials and build social proof, so that it’s easier to acquire new customers.
It’s common to incentivize customers to leave a review, but Compass Coffee devised a way to get even more value from their discount incentive.
First, the brand uses Klaviyo to customize the trigger for their review request flow, so it only goes out after an order is delivered.
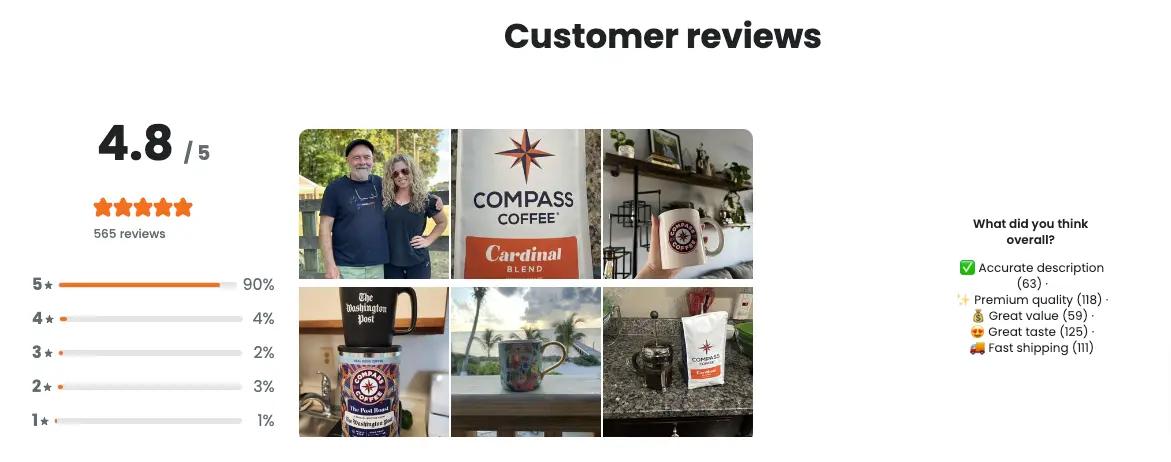
Second, thanks to Klaviyo Reviews, Compass Coffee was able to set up a conditional split: if a review has a photo, the reviewer gets a 15% discount on their next order; if it doesn’t, they simply get a thank-you email and a reminder to leave a photo next time.
In their first quarter with Klaviyo Reviews, Compass Coffee saw a 3.7x QoQ jump in reviews submitted with images—and a 70.5% jump in total reviews submitted. Now, their review section looks like an Instagram feed you want to engage with—and shoppers can better envision how the brand’s coffee will fit into their lives.
Product review request pro tip:Time your review requests based on product usage to maximize responses.
6. Replenishment reminders
A replenishment reminder is an email that automatically reminds the customer to re-stock their supply when a product is running low. The goal of the replenishment reminder email is to encourage repeat purchases for consumable products.
Toilet paper supplier Who Gives A Crap sends this replenishment email when their customers might need another shipment. It’s silly, laugh-out-loud funny, and, most importantly, memorable.

If you sell a lot more products than just toilet paper, you can get more granular with your replenishment reminders. Take it from Force of Nature—the cleaning brand currently has 49 live automations, many of which encourage customers to repurchase.
Since some products in their catalog last longer than others, Force of Nature sends replenishment reminders on SKU-specific timelines to maximize the likelihood that a customer’s supply is running low when they receive the email. It’s all part of a revamped flows strategy that has driven 140% YoY growth in YTD revenue from Klaviyo flows.
Replenishment reminder pro tip: Use predictive analytics to send reminders immediately before customers are likely to run out. Now that they’ve switched to Klaviyo, men’s grooming brand Every Man Jack plans to use AI-powered re-stock reminders triggered by the customer’s predicted next order date.
7. Back-in-stock notifications
Back-in-stock notifications inform customers when previously unavailable items are available for purchase again. These automations are important for creating a sense of scarcity—the item sells out, so it must be coveted—and urgency—“get them while supplies last.”
They’re also a great way to gauge interest in certain products, which can help brands right-size their orders.
Water filter brand Lifestraw, for example, encourages people to sign up for alerts on specific products. It helps their operations team stock accordingly—and contributes to the bottom line, too. After their first quarter with Klaviyo flows, Lifestraw beat their overall 2022 email revenue goals by more than 2x.
You can also be proactive with your back-in-stock notifications like Red Clay Hot Sauce. The brand uses a back-in-stock flow for customers who request updates on a specific SKU, but they also like sending back-in-stock (and low-in-stock) campaigns to broader audiences.
These branded sends create FOMO around bestsellers, and they’re a great example of how email automation and campaigns can work together to drive conversions. No wonder Red Clay Hot Sauce has generated 15.6x ROI from Klaviyo YTD.
Back-in-stock notification pro tip: Prioritize VIP customers for early alerts.
8. Instructional emails
Instructional emails educate customers on how to use or maintain their products. Similar to other types of post-purchase emails, the goal of an instructional email is to demonstrate proactive customer service and improve the post-purchase experience.
But you can also send these at any time—because the ultimate goal of these emails is show you care about the customer’s experience with your product.
If you want your instructional emails to be timely and relevant, try sending educational content that follows seasonal trends. For example, beauty brand ILIA sent this email in August 2024, teaching their audience how to apply their makeup by “following the sun” to achieve that “golden-hour glow.”

Instructional email pro tip: Link to video tutorials on your website for deeper engagement and potential product page browsing.
9. VIP customer exclusive emails
VIP customer exclusive emails reward your best customers with special perks. Once a customer spends a certain amount or buys a certain number of times, you can use automation to add them to a VIP segment and trigger an email that sends an exclusive discount or early access to new product launches.
Callie’s Hot Little Biscuit automated their VIP offers after points-based apps failed to gain traction with their customers. On average, Callie’s customers made two purchases per year—but with the right incentives at the right time, their CEO suspected they would buy more often.
To test this theory, they set up Klaviyo flows so that:
- A customer’s second order in a year triggers an alert that they’ll get V.I.B. (Very Important Biscuiteer) status with their next order.
- A customer’s third order triggers an alert that they’ll get free shipping on their next order.
Since this VIP automation launched in June 2023, it’s helped power 157.8% YoY growth in revenue from flows.
VIP exclusive pro tip: Use Klaviyo segmentation to create dynamic VIP tiers that automatically expand and contract based on predetermined criteria.
10. Birthday and anniversary emails
Birthday and anniversary emails celebrate milestones—and that strengthens customer relationships. Everyone remembers brands that give them a little extra something for a special occasion, and milestone emails are a way to make sure your brand is top of mind for the rest of the year.
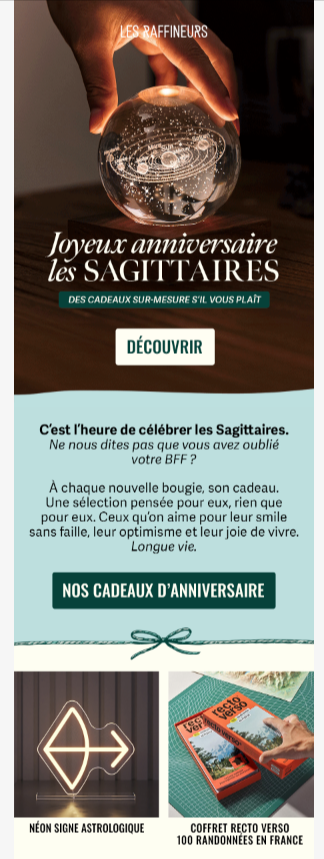
French lifestyle brand Les Raffineurs offers a few unique takes on the birthday email. The example below is a birthday email celebrating all Sagittariuses, who are apparently known for their smiles, optimism, and joie de vivre. The email is a gift guide catering to the characteristics of this specific star sign, which readers can either apply to themselves or their favorite Sag friend.
The brand also celebrates half birthdays as a fun twist on the conventional birthday email. “We have subscribers’ birthday data in our accounts, so why not use it?” points out Jean-Baptiste Gauche, the brand’s ecommerce manager. “Our half-birthday flow is a good excuse to say something like, ‘What did you buy last time you bought something from us? Maybe these new products will also interest you.’”
Birthday and anniversary email pro tip: Offer exclusive discounts or gifts to make the occasion memorable.
How to get started with ecommerce email automations
You need a marketing automation platform that can centralize customer data, segment your audience, then send triggered emails based on your dynamic segments. Klaviyo is purpose-built for ecommerce, with 350+ integrations and advanced automation capabilities.
Use real-time customer data to tailor messaging for different customer groups. Dynamic segmentation fills each segment with customer profiles based on how they behave—all you need to do is create the rules, and let the platform do the rest.
Continuously A/B test your automations to improve performance. You’ll start to notice patterns with click rates, conversion rates, and open rates—and it’s only through monitoring that you’ll be able to learn and improve your email automations over time.
Email marketing automation is essential for ecommerce success in 2024. By implementing these top 10 email automations, you’ll boost revenue, enhance customer experiences, and make your marketing efforts more efficient. With a platform like Klaviyo, taking your email strategy to the next level has never been easier.
Power smarter digital relationships with Klaviyo SMS.
Get started
Related content