Solution Recipes are tutorials to achieve specific objectives in Klaviyo. They can also help you master Klaviyo, learn new third-party technologies, and come up with creative ideas. They are written mainly for developers & technically-advanced users.
Note: We do our best to make sure any code and API references are accurate and current when this is published, but you might need to update code and it’s always a best practice to leverage ourlatest API versions. If you have questions, feel free to hop over to ourDeveloper Community.
How to utilize flow webhooks functionality and send additional data to Klaviyo by using Track/Identify API endpoints, transform the data, and ingest properties at the top-level that were previously nested deeper within the data structure.We will showcase two main examples:a) Use Klaviyo’s webhooks and track API to transform the event data that was previously deeply nested and not usable in segments and flow filters.b) Use Klaviyo’s webhooks to extract a value from a metric and utilize the Identify API to help dynamically personalize the content in an email.
It’s not always possible to control how the original data is passed to Klaviyo, especially from a third-party app, which can make it challenging to customize flows, campaigns, etc.What we can do on our end — use Klaviyo’s flow webhooks and Track/Identify API endpoints to transform the ingested data for further email/sms personalization.
Moderate
Introduction
By popular demand, Klaviyo has launched flow webhooks. This functionality helps explore more avenues with ingesting and passing data, and makes the life of the merchants/developers easier.
Klaviyo flow webhooks pass the information to third-party applications by making an HTTP POST request via a flow action. Data sent can include anything you would normally be able to access in a flow, including customer profile and event data.
There is a lot that can be done via Klaviyo flow webhooks, it is incredibly powerful because at its core it allows you to send a POST request that is triggered based on any of the available flow triggers, including being added to a segment or list, in response to an event, or at a specific timestamp.
Today, we will discuss two specific instances, using webhooks and Klaviyo’s APIs to hydrate additional data into Klaviyo.The steps below will showcase how to pass the nested data back to Klaviyo as top-level and be able to segment that data to further personalize emails. You will also learn how to extract a profile property and add it directly to the template in Klaviyo.
Challenge
To better understand what these two API endpoints ( track/identify) entail, here is a brief definition/distinction of the two. Identify and Track are used to store customer data and track activity.
The Create or Update profile endpoint updates properties about a recipient without tracking an associated event.
Example: recipient’s information about their city of residence, their birthday, favorite color, etc.
Create Event endpoint is used to track a profile activity.
Example: customer placed an order, cancelled order, etc.
The below image illustrates the capabilities of API vs flow webhooks at Klaviyo:
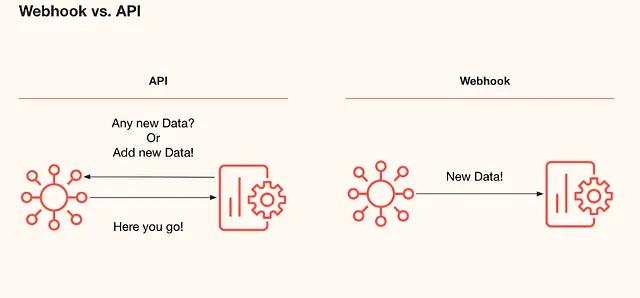
Note: Flow webhooks are not meant to be a two-way exchange of data in Klaviyo. Unlike API’s, they only work in one-direction which is posting the new information.
Ingredients
- Klaviyo flow with a webhook action using the Create or Update Profile endpoint to ingest that data back to Klaviyo.
- Klaviyo flow with webhook action using Create Event endpoint to remap the event data and send the events back to the Events API to make nested properties top-level, segment the data for future personalization of messages
Instructions
Example 1: Using webhooks and Create or Update Profile API endpoint:
Let’s say you wanted to send additional data to Klaviyo such as a sleep preference value that would help personalize your email template and use the dynamic values to populate that data about each recipient. It has historically been hard to do because our profile property setting requires you to type out the hard-coded value in the template, whereas in this case, the value will be dynamic from the event payload. Below are the steps that will help execute the above task:
1. Create flow with webhook action:
You will need to go to flows in Klaviyo → select trigger → drag-drop the webhook action in actions tab
2. Configure the webhook settings:
Destination URL: https://a.klaviyo.com/api/profile-import
Headers:
Key | Value |
Content-type | application/vnd.api+json |
accept | application/vnd.api+json |
revision | 2024-10-15 |
Authorization | Klaviyo-API-Key {YOUR_PRIVATE_API_KEY} |
You will need to create a Private API Key with the scopes: profile:write
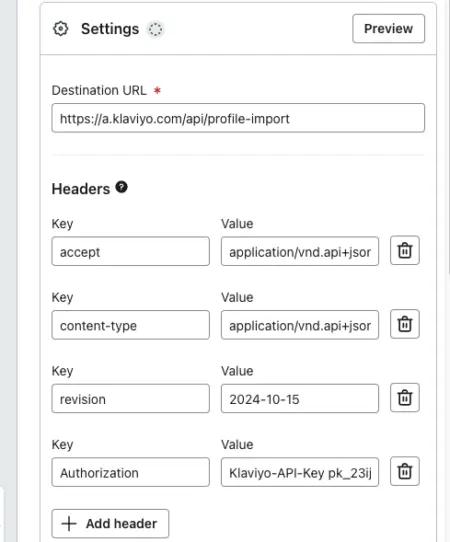
In our particular case, we are adding “ShippingRate” property, so we can dynamically populate it per recipient, instead of relying on a hard-coded value in the email template.
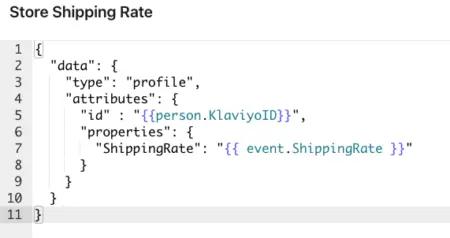
The JSON Payload used is below. In the properties section, this is where you can add the information you want to store as a profile property. In this example we are creating a new profile property called “ShippingRate” and setting it to the value of “ShippingRate” from our event.
{
  "data": {
    "type": "profile",
    "attributes": {
      "id" : "{{person.KlaviyoID}}",
      "properties": {
        "ShippingRate": "{{ event.ShippingRate }}"
      }
    }
  }
}
3. Test the webhook:
Once we are done with the above configuration, let’s go ahead and test the results.Click on the preview webhook button → send test request → make sure you get the success message in the top right corner of the flow page:
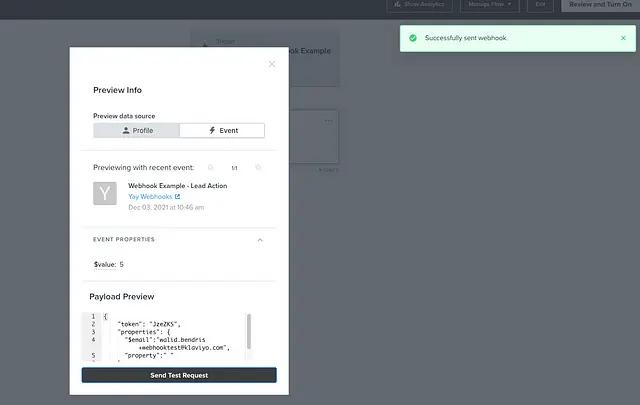
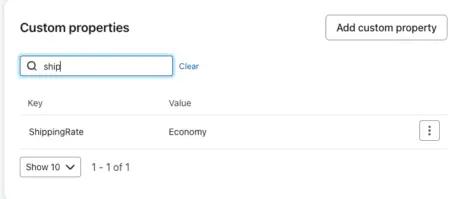
Now, lets see if the properties registered in the profile of the recipient we tested the webhooks for:It looks like the test worked, “ShippingRate” for the recipient we sent a webhook is now set to “Economy”.
4. Add the property for sleep preference to the email template:
You could now use this profile property in segmentation or in any email template using the syntax {{person.ShippingRate}}
Example 2: Using webhooks and Create Event endpoint:
Before we showcase the example using Create Event request, let’s briefly discuss what the top-level and nested properties are in general. A top-level property is an object which represents data that can be segmented and filtered on within Klaviyo, while nested properties are available to use in message templates, they are not identified as segmentable or filterable data points if they are not top-level. In order to be able to segment data in Klaviyo, values need to be sent as top-level properties.
For example, let’s say someone has placed an order that contains a lot of valuable information that is nested, such as SKU, ItemID, Quantity, etc. If you wanted to segment the placed order by SKU to later personalize your content, you’d need to send that data over as a top-level property.
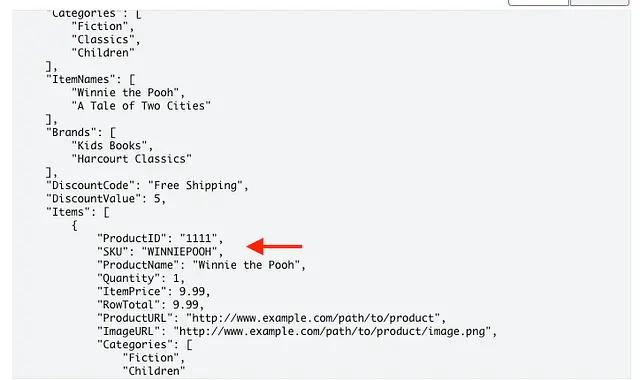
As mentioned above, this can be done by utilizing our flow webhooks functionality and Klaviyo’s Create Event API endpoint. You might wonder about the benefits of nested data, especially that it can’t be segmented. The answer is that it comes in handy when sending messages using data in the metric. In the example we mentioned above, so you can display properties about each brand by iterating through the nested data in the message template. Below are the steps that show how to remap the data from nested to top-level property values.
1. Create webhooks flow:
Go to flows in Klaviyo → select trigger → drag-drop the webhook action in the actions tab:
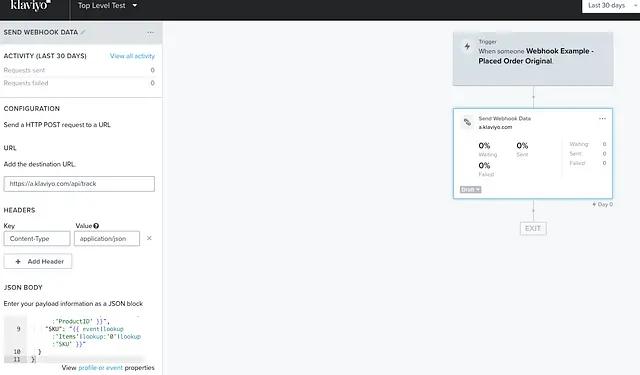
2. Configure the webhook:
Make sure to setup the destination URL which is
Destination URL: https://a.klaviyo.com/api/events
Key | Value |
Content-type | application/vnd.api+json |
accept | application/vnd.api+json |
revision | 2024-10-15 |
Authorization | Klaviyo-API-Key {YOUR_PRIVATE_API_KEY} |
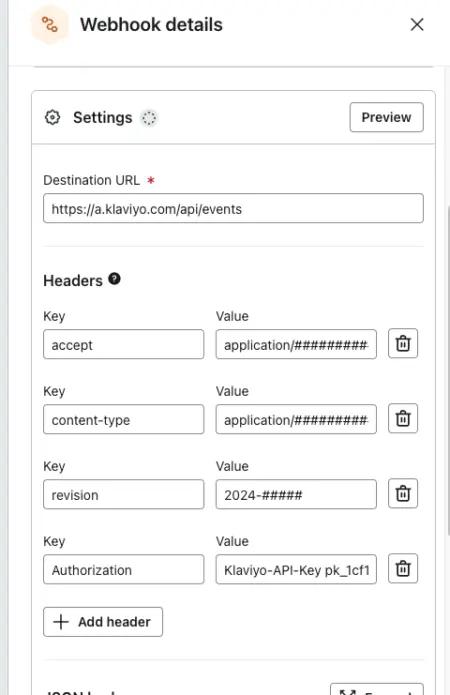
To build the JSON body, you will include the properties you want and also include the name of the event you want to record.
Here is the syntax you’d need to add in the JSON block:
{
  "data": {
    "type": "event",
    "attributes": {
      "properties": {
        "Shipping Rate": "{{event.ShippingRate}}"
      },
      "metric": {
        "data": {
          "type": "metric",
          "attributes":{
            "name" : "Selected Shipping Rate"
          }
        }
      },
      "profile": {
        "data": {
          "type": "profile",
          "attributes": {
          },
          "id": "{{person.KlaviyoID}}"
        }
      }
    }
  }
}
The “Selected Shipping Rate” is the name of the new event that will be created
The “properties” section is where the event information will go and can be modified as needed.
3. Test the webhook:
Once you are done with setting up the webhooks configuration, go ahead and test the results.Click on the preview webhook button → send a test request → make sure you get the success message in the top right corner of the flow page.
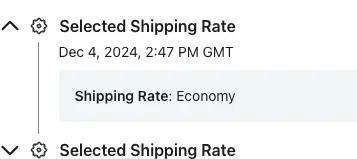
4. Test if the nested property got remapped and if we can segment the new top-level data:
Looks like we got the product ID and SKU in the event data:
Impact
This Solution Recipe displays how to maneuver the flow webhooks in combination with the Identify/Track API requests to ingest the additional data to Klaviyo without the need to make changes at the original data source.
The above examples demonstrate practical use-cases showing that webhooks are a powerful tool, and capable of much creativity. They can enhance and create new possibilities for personalization, templates, campaigns, segmentation, and more.
To learn more about Klaviyo’s webhooks, check out this link!
Learn more
If you’re interested in learning more about Klaviyo’s developer experience and capabilities, please visit developers.klaviyo.com!
