The Mollie integration is available via direct API for custom-built platforms. Mollie and Klaviyo can be also used together with your ecommerce platforms: WooCommerce, Wix, BigCommerce, Prestashop, Shopify, Salesforce Commerce Cloud.
This guide explains how you can use Mollie’s powerful set of APIs and Klaviyo’s Napkin.io platform to sync payment information to Klaviyo. Allowing you to personalise your email flows to enhance revenue and boost growth.
Integration benefits
Integrating Mollie with Klaviyo enables:
- Sync and enrich customer profiles on Klaviyo based on transaction and order data.
- Easily organise new customer information and create powerful audience segments.
- Create custom email flows leveraging events and metrics – triggered in realtime to Klaviyo from Mollie.
- Incorporate Mollie’s payment and order data into your pre-built email automations.
- Build personalised emails for your subscribers that are automatically triggered based on their subscription status*
*Whether you can sync your Mollie subscription payments data into Klaviyo depends on your subscription management solution – please reach out to technologypartners@klaviyo.com if interested and we’ll check whether you’re eligible.
Sync Mollie Payments
Follow the steps below to sync your payment and order data from Mollie’s platform and enrich customer profiles in Klaviyo.
Step 1) If you don’t already, signup for a free Napkin.io account. Napkin is a Klaviyo tool that allows you to run and execute code on a schedule. It will be used to synchronise data between Mollie and Klaviyo.
Step 2) Once you have signed up for your account, upgrade it to the Pro version.
Step 3) We are now going to clone the “function” that will synchronise the data from Mollie to Klaviyo. A function is essentially code that will execute on a schedule. You can clone the function by clicking on the link below:
https://www.napkin.io/n/8099819ce4d34a5f
Step 4) When you clone the function, you should see the code appear in your Napkin account and any necessary dependencies will also be installed.
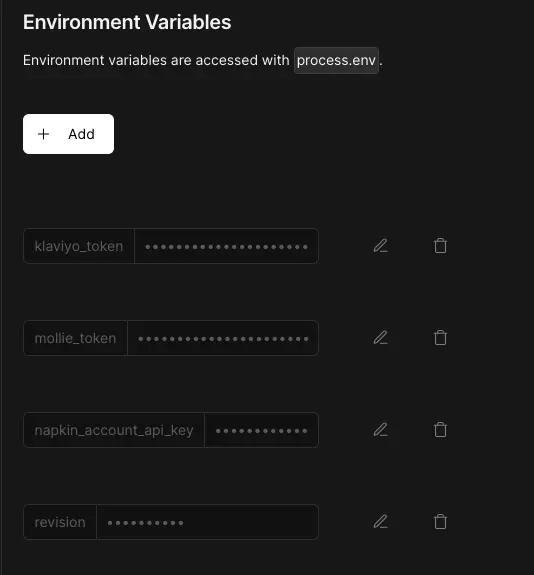
We now need to configure some Environment Variables. These details are required so the function knows which Mollie and Klaviyo account to synchronise data between.
To add them, navigate to “Other” tab.

Next scroll down to Environment Variables.
After pressing “Add”, enter the name of the variable as the key, and its associated value.
You will need to add the below variables
- klaviyo_token
- mollie_token
- napkin_account_api_key
- revision
klaviyo_token -> This is the private Klaviyo API key. The format should look like this: pk_xxxxxxxxxxxx4587. You will need to create your Klaviyo API Key with write permissions.
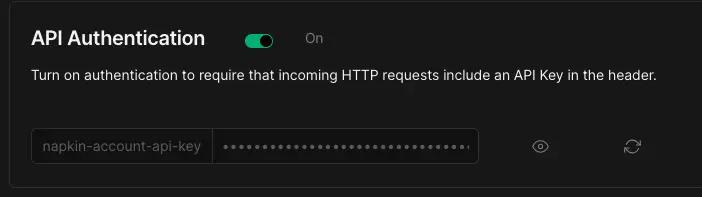
napkin_account_api_key -> This is the id of the account which can be found under API Authentication (press the “eye” button to see the key) .
revision -> 2022-10-17
mollie_token -> This it the API key that you can get from your Mollie account.
Step 5) When all the Variables are entered, enable API Authentication by enabling the toggle button. This ensures the code can only be executed by Napkin and keeps it secure.
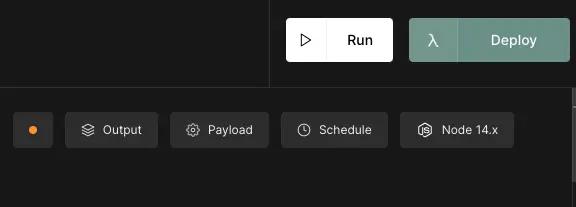
Step 6). For the final step, click on the Code tab again and copy the url of the function which is located towards the top of the window. (It should have a green padlock next to it).

Once it is copied, replace it within the “const napkin_url” in the code at line 20. The final result should look something like this:
Schedule and deploy your integration
Now you have completed setting up your integration, the last step involves deploying the code and scheduling it to execute.
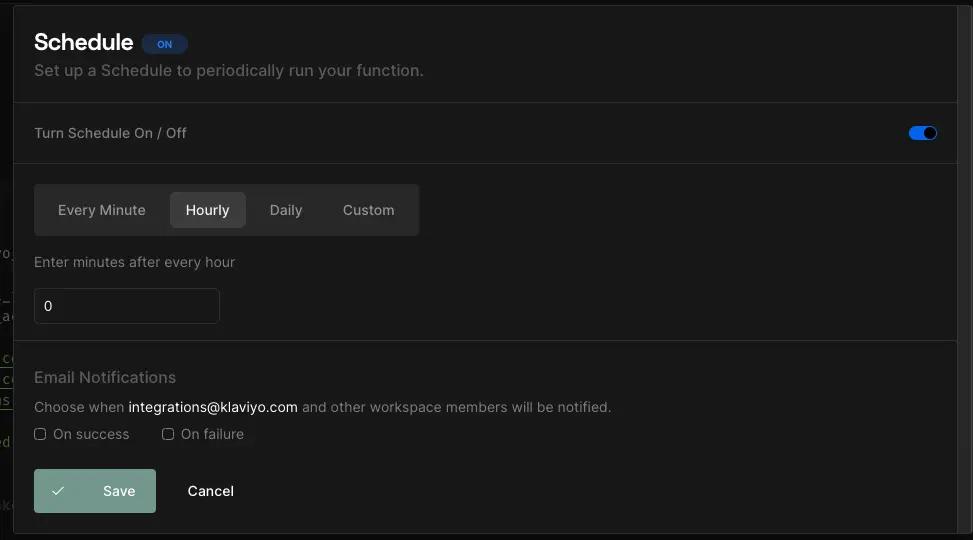
Click on the “Deploy” button in the top right corner to deploy your code. Next click on the “schedule” button.
Set the schedule to run every hour and enable email notifications for any failures.
And that’s it! Your integration is now live!
You can start the integration manually and ensure there are no errors by clicking the “run” button in the top right corner. In a few minutes, you should start to see your Mollie data appear in your Klaviyo account.
Sync Mollie Payments
The process to sync your payments from Mollie follows the exact same steps as above, except you will clone the code from below into your account.
https://www.napkin.io/n/44db9ba8493c47a8
Follow steps 4-6, deploy and schedule this function to start synchronising payment data into Klaviyo.
Review your Mollie data in Klaviyo
Metric Name: Mollie Orders
Fields
- order amount currency
- order amount value
- order amountCaptured currency
- order amountCaptured value
- order amountRefunded currency
- order amountRefunded value
- order billingAddress city
- order billingAddress country
- order billingAddress email
- order billingAddress familyName
- order billingAddress givenName
- order billingAddress organizationName
- order billingAddress phone
- order billingAddress postalCode
- order billingAddress region
- order billingAddress streetAdditional
- order billingAddress streetAndNumber
- order billingAddress title
- order completedAt
- order consumerDateOfBirth
- order createdAt
- order expiredAt
- order id
- order method
- order orderNumber
Metric Name : Mollie Payment
Fields
- payment.method
- payment.description
- payment.amount.value
- payment.createdAt
- payment.orderId
- payment.expiredAt
- payment.amount.currency
- payment.customerId
- payment.expiredAt
- payment.id
- payment.paidAt
- payment.profileId
- payment.sequenceType
- payment.status
- payment.subscriptionId
Additional resources
If you have any further questions on this integration, or would like to learn more about building your own integration with Napkin.io, then please email technologypartners@klaviyo.com
